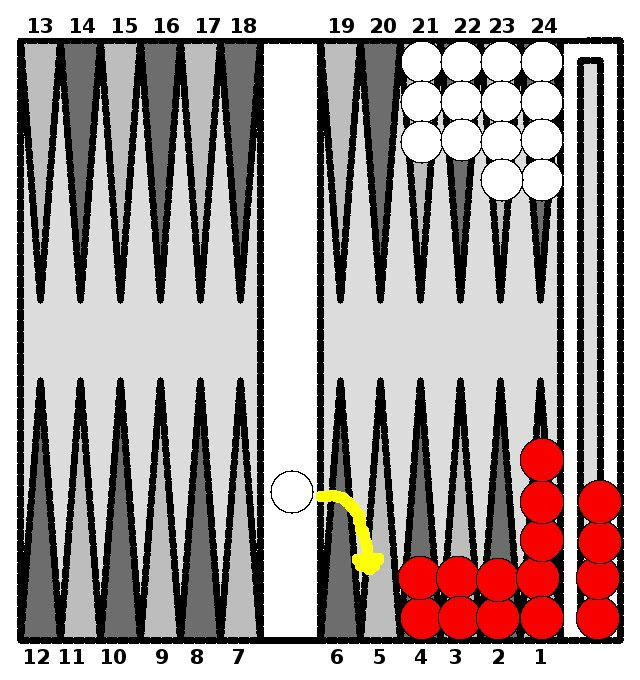
(A balanced home field for Red. He can remove 1 stone for the turn for each 4, 5 or 6 on the dice. Otherwise he just moves the stones from point-4 in closer to the tray.)
Let’s look at a couple situations. First, let’s say that you played a back game, succeeded in creating a rolling wall, trapped your opponent on the bar, then worked at keeping an even number of stones on the points farthest from the tray. This is a very balanced home field. No matter what you roll, you can take a stone off that point and put it in the tray immediately. If you’re lucky, you’ll get a 6 in the first roll, like 6-3 or 6-1. After both stones from point-6 are gone (one to the tray, the other to a lower-numbered point), any 5’s and 6’s you roll can be used to take the stones off the 5-point. 4’s, 5’s and 6’s clean off the 4-point, and by this stage you’ve pretty much won the game. High doubles work pretty much the same way.

(Unbalanced board for Red. Very top heavy. White makes a break for the running game.)
Next, we get the above board. Here, Red was just trying to get his stones into his home field as fast as he could, meaning point-5 and point-6 are top-heavy, when White broke into a running game. Red is stuck with what he’s got and needs to make the best of the situation. The two general rules are:
1) Bear off as many stones as you can when you can.
2) Bring the farthest stones in when you can’t follow rule 1.
Say Red rolls a 1-4. He doesn’t have anything on the 4-point, so he moves a stone from 5 to 1, then to the tray. If he rolls 6-1, then take stones from both points to the tray. Roll double 4’s? Take 4 stones from the 6-point and put them on the 2 point. When you clear out the lower points, start moving stones from point-6 to the lower points.
The purpose of this approach is to capitalize on high-doubles. Granted, the chances of getting double 6’s is 2.5%, but after you clear off point-6, you’ll profit from double 5’s as well (letting you take 4 stones off per turn), at a 5% chance for double 5’s or 6’s. Move the stones off point-5 too, then you profit from any high doubles, plus any regular roll including a 4, 5 or 6.
In other words, the closer your “center-of-balance” is to the tray, the better your chances of taking 2 stones off per turn, and the more impact doubles will have. Naturally, your opponent will be using the same strategy, so the winner will be the one that gets more 6’s, 5’s and high doubles. You just want to be sure that you’re in a position to benefit from them if you get them. The odds are low, but if you play enough games you can turn things to your favor occasionally.

(Sometimes, how you play the dice doesn’t matter much.)
Having said that, what about this board? Red rolls a 1-2. Does it really matter how you move? At this point, not really. You could take off one stone from point-3, or take one from 2 and move point-4 to point-3. The really big impact from moving stones inward occurs with stones on points 4 through 6 because the average for a 6-sided die is 3.5. That is, if you have a stone on point-6, there’s only a 1/6th chance of getting a 6 to remove it in one turn. Any other number and you have to move the stone closer to the tray. With an average of 3.5, the stone will probably go from point-6 to point-2, and then go to the tray in the next roll (if it’s the only stone on the board, a roll of anything 2 and higher will make it go to the tray, which is a 5/6th’s chance).
Moving the stone on point-4 to point-3 does mean that dice rolls of 3 and better will take off 2 stones at a time (3-5, 4-6, etc.), and that’s a 66.6% chance. But, that means that you have nothing on point-1 or point-2, so rolling a 1 or a 2 forces you to move stones from 3 closer to the tray without bearing anything off (33.3% chance on each die). The guideline here is to prepare yourself so that if you get doubles you can bear all remaining stones off in one turn, while maximizing the number of stones you can take off in the next turn. In general practice, in the above board with a roll of 1-2, taking one stone from point-3 to the tray will let you finish the game in 3 more turns, and occasionally in 2 turns. Very rarely, it may take 4 turns. If you’re WAY ahead, or WAY behind your opponent, that extra one turn isn’t going to make a difference.
To be continued.
